Container Hardening
Task 1 Introduction
So far, this module has taught you the basics of Docker and the potential vulnerabilities associated with containers. This room will teach you the various ways of securing your containers.
Learning Objectives
- Secure the Docker daemon to prevent unauthorised interaction.
- Correctly assign privileges (capabilities) to containers.
- Prevent faulty or malicious containers from exhausting a system.
- Utilise security features such as Seccomp and AppArmor to define how your containers will behave with the operating system.
- Practice good hygiene by reviewing Docker images for vulnerabilities - Implement frameworks and tooling that reviews your code for vulnerabilities.
Prerequisites
In order for you to complete this room, it is essential that you are familiar with the various components of Docker. I highly recommend completing the Intro to Docker room before proceeding.
Read the above before proceeding to the next task!
No answer needed
Task 2 Protecting the Docker Daemon
You may recall from the Container Vulnerabilities room that the Docker daemon is responsible for processing requests such as managing containers and pulling or uploading images to a Docker registry. Docker can be managed remotely and is often done in CI (Continuous Integration) and CD (Continuous Development) pipelines. For example, pushing and running new code in a container on another host to check for errors.
If an attacker can interact with the Docker daemon, they can interact with the containers and images. For example, they launch their own (malicious) containers or gain access to containers running applications with sensitive information (such as databases).
The Docker daemon is not exposed to the network by default and must be manually configured. However, exposing the Docker daemon is a common practice (especially in cloud environments such as CI/CD pipelines).
Implementing secure communication and authentication methods such as those listed below are extremely important in preventing unauthorised access to the Docker daemon.
SSH
Developers can interact with other devices running Docker using SSH authentication. To do so, Docker uses contexts which can be thought of as profiles. These profiles allow developers to save and swap between configurations for other devices. For example, a developer may have one context for a device with Docker for development and another context for a device with Docker for production.
Note: You must have SSH access to the remote device, and your user account on the remote device must have permission to execute Docker commands.
As the developer, you will need to create the Docker context on your device. Please see the code snippet below to create a context within Docker.
client@thm:~# docker context create
--docker host=ssh://myuser@remotehost
--description="Development Environment"
development-environment-host

Successfully created context "development-environment-host"
Once this has been completed, you can switch to this context, where all Docker-related commands will now be executed on the remote host.
cmnatic@thm:~# docker context use development-environment-host

Current context is now "development-environment-host"
To exit this context and, for example, use your own Docker engine, you can revert to "default" via docker context use default.
Note: This is not entirely secure. For example, a weak SSH password can lead to an attacker being able to authenticate. Strong password hygiene is strongly recommended. Some tips for a strong password have been included below:
- A high amount of characters (i.e. 12-22+)
- Special characters such as !, @, #, $
- Capital letters and numbers placed sporadically throughout (i.e. sUp3rseCreT!PaSSw0rd!)
Docker contexts allow you to interact with the Docker daemon directly over SSH, which is a secure and encrypted way of communication.
TLS Encryption
The Docker daemon can also be interacted with using HTTP/S. This is useful if, for example, a web service or application is going to interact with Docker on a remote device.
To do this securely, we can take advantage of the cryptographic protocol TLS to encrypt the data sent between the devices. When configured in TLS mode, Docker will only accept remote commands from devices that have been signed against the device you wish to execute Docker commands remotely.
Note: Creating and managing TLS certificates is out-of-scope for this room, as you will often need to consider factors such as expiry date and strength of encryption for your environment. Once you have created your certificates, you can tell Docker to run in TLS mode with the generated certificate.
On the host (server) that you are issuing the commands from:
server@thm:~# dockerd --tlsverify --tlscacert=myca.pem --tlscert=myserver-cert.pem --tlskey=myserver-key.pem -H=0.0.0.0:2376
On the host (client) that you are issuing the commands from:
client@thm:~# docker --tlsverify --tlscacert=myca.pem --tlscert=client-cert.pem --tlskey=client-key.pem -H=SERVERIP:2376 info
Note: It is important to remember that this is not guaranteed to be secure. For example, anyone with a valid certificate and private key can be a "trusted" device. I have explained the arguments used in generating a TLS certificate and key in the table below:
| Argument | Description |
|---|---|
--tlscacert | This argument specifies the certificate of the certificate authority. A certificate authority is a trusted entity that issues the certificates used to identify devices. |
--tlscert | This argument specifies the certificate that is used to identify the device. |
--tlskey | This argument specifies the private key that is used to decrypt the communication sent to the device. |
What would the command be if we wanted to create a Docker profile?
docker context create
What would the command be if we wanted to switch to a Docker profile?
docker context use
Task 3 Implementing Control Groups
Control Groups (also known as cgroups) are a feature of the Linux kernel that facilitates restricting and prioritising the number of system resources a process can utilise.
For example, a process such as an application can be restricted to only use a certain amount of RAM or processing power or given priority over other processes. This often improves system stability and allows administrators to track system resource use better.
In the context of Docker, implementing cgroups helps achieve isolation and stability. Because cgroups can be used to determine the number of (or prioritise) resources a container uses, this helps prevent faulty or malicious containers from exhausting a system. Of course, the best mechanism is preventing this from happening, but preventing a container from bringing down a whole system is an excellent second line of defence.
This behaviour is not enabled by default on Docker and must be enabled per container when starting the container. The switches used to specify the limit of resources a container can use have been provided in the table below:
| Type of Resource | Argument | Example |
|---|---|---|
| CPU | --cpus (in core count) | docker run -it --cpus="1" mycontainer |
| Memory | --memory (in k, m, g for kilobytes, megabytes or gigabytes) | docker run -it --memory="20m" mycontainer |
You can also update this setting once the container is running. To do so, use the docker update command, the new memory value, and the container name. For example: docker update --memory="40m" mycontainer.
You can use the docker inspect containername command to view information about a container (including the resource limits set). If a resource limit is set to 0, this means that no resource limits have been set.
cmnatic@thm:~# docker inspect mycontainer
--cropped for brevity--
            "Memory": 0,
            "CpuQuota": 0,
            "CpuRealtimePeriod": 0,
            "CpuRealtimeRuntime": 0,
            "CpusetCpus": "",
            "CpusetMems": "",
            "CpuCount": 0,
            "CpuPercent": 0,
--cropped for brevity--
Docker uses namespaces to create isolated environments. For example, namespaces are a way of performing different actions without affecting other processes. Think of these as rooms in an office; each room serves its own individual purpose. What happens in a room in this office will not affect what happens in another office. These namespaces provide security by isolating processes from one another.
What argument would we provide when running a Docker container to enforce how many CPU cores the container can utilise?
--cpus
What would the command be if we wanted to inspect a docker container named "Apache"?
docker inspect apache
Task 4 Preventing "Over-Privileged" Containers
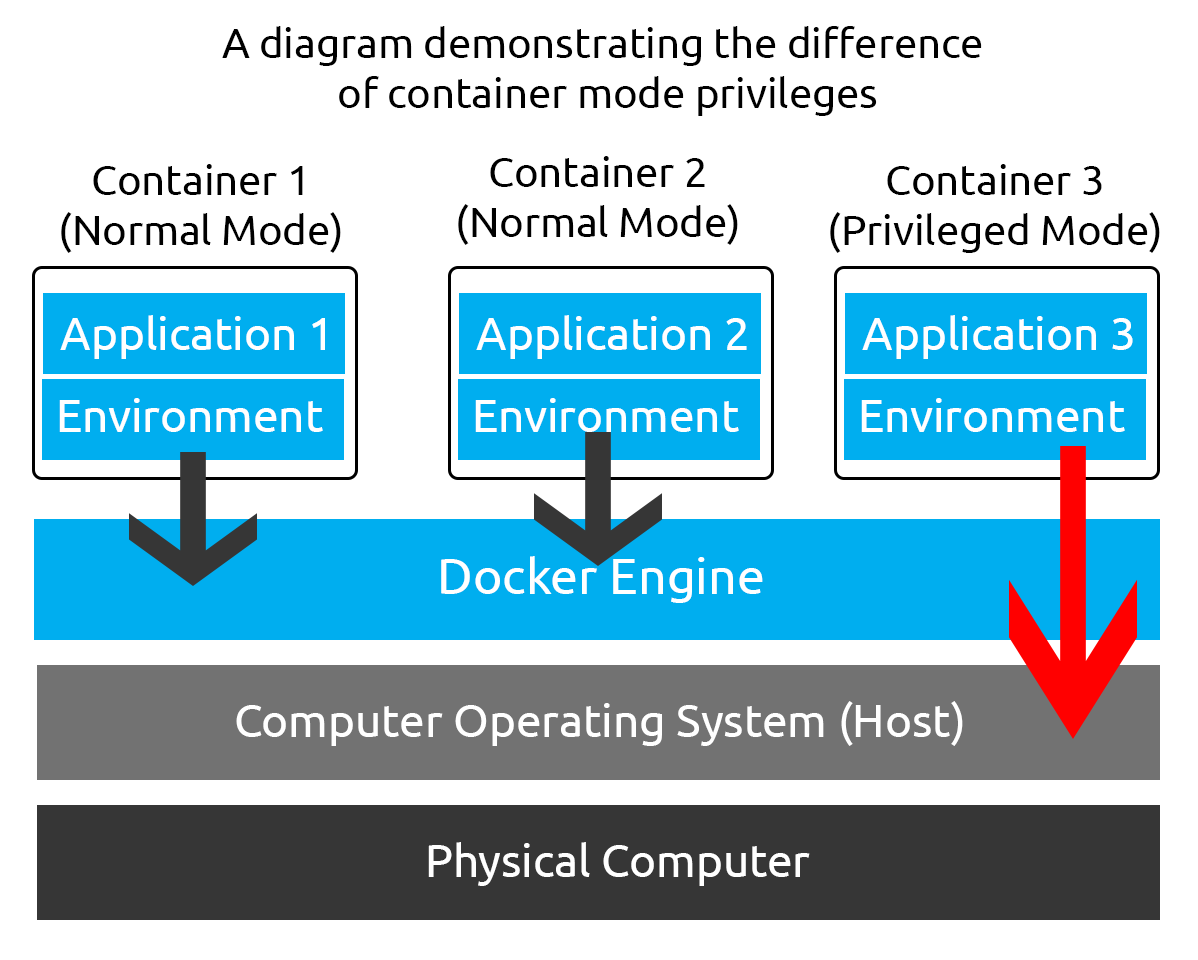
First, we need to understand what privileged containers are in this context. Privileged containers are containers that have unchecked access to the host.
The entire point of containerisation is to "isolate" a container from the host. By running Docker containers in "privileged" mode, the normal security mechanisms to isolate a container from the host are bypassed. While privileged containers can have legitimate uses, for example, running Docker-In-Docker (a container within a container) or for debugging purposes, they are extremely dangerous.
When running a Docker container in “privileged” mode, Docker will assign all possible capabilities to the container, meaning the container can do and access anything on the host (such as filesystems).
What are capabilities, I hear you ask? Capabilities are a security feature of Linux that determines what processes can and cannot do on a granular level. Traditionally, processes can either have full root privileges or no privileges at all, which can be dangerous as we may not want to allow a process to have full root privileges as it means it will have unrestricted access to the system.
Capabilities allow us to fine-tune what privileges a process has. I have placed some standard capabilities in the table below, what privileges they translate to, and where they may be used:
| Capability | Description | Use Case |
|---|---|---|
| CAP_NET_BIND_SERVICE | This capability allows services to bind to ports, specifically those under 1024, which usually requires root privileges. | Allowing a web server to bind on port 80 without root access. |
| CAP_SYS_ADMIN | This capability provides a variety of administrative privileges, including being able to mount/unmount file systems, changing network settings, performing system reboots, shutdowns, and more. | You may find this capability in a process that automates administrative tasks. For example, modifying a user or starting/stopping a service. |
| CAP_SYS_RESOURCE | This capability allows a process to modify the maximum limit of resources available. For example, a process can use more memory or bandwidth. | This capability can control the number of resources a process can consume on a granular level. This can be either increasing the amount of resources or reducing the amount of resources. |
To summarise, privileged containers are containers assigned full privileges - i.e., full root access. Attackers can escape a container using this method. If you would like homework, this process has been demonstrated in the Container Vulnerabilities room.
It's recommended assigning capabilities to containers individually rather than running containers with the --privileged flag (which will assign all capabilities). For example, you can assign the NET_BIND_SERVICE capability to a container running a web server on port 80 by including the --cap-add=NET_BIND_SERVICE when running the container.
cmnatic@thm:~# docker run -it --rm --cap-drop=ALL --cap-add=NET_BIND_SERVICE mywebserver
Finally, the command capsh --print can be used to determine what capabilities are assigned to a process.
cmnatic@thm:~# capsh --print
Current: =
Bounding set = cap_chown,cap_dac_override,cap_dac_read_search,cap_fowner
-- cut for brevity ---
cap_sys_rawio,cap_sys_chroot,cap_sys_ptrace,cap_sys_pacct,cap_sys_admin,
cap_sys_boot,cap_sys_nice,cap_sys_resource,cap_sys_time,cap_sys_tty_config,cap_mknod
-- cut for brevity ---
Ambient set =
Current IAB:
Securebits: 00/0x0/1'b0
 secure-noroot: no (unlocked)
 secure-no-suid-fixup: no (unlocked)
 secure-keep-caps: no (unlocked)
 secure-no-ambient-raise: no (unlocked)
uid=1000(cmnatic) euid=1000(cmnatic)
gid=1000(cmnatic)
groups=4(adm),20(dialout),24(cdrom),25(floppy),27(sudo),1000(cmnatic)
It is important to frequently review what capabilities are assigned to a container. When a container is privileged, it shares the same namespace as the host, meaning resources on the host can be accessed by the container - breaking the "isolated" environment.
What is the name of the capability that allows services to bind to ports (specifically those under 1024)?
CAP_NET_BIND_SERVICE
What argument would we provide when starting a Docker container to add a capability?
--cap-add
Finally, what command (with argument) would we use to print the capabilities assigned to a process?
capsh --print
Task 5 Seccomp & AppArmor 101
Seccomp is an important security feature of Linux that restricts the actions a program can and cannot do. To explain, picture a security guard at the entrance of an office. The security guard is responsible for making sure that only authorised people are allowed into the building and that they do what they are supposed to do. In this scenario, Seccomp is the security guard.
Seccomp allows you to create and enforce a list of rules of what actions (system calls) the application can make. For example, allowing the application to make a system call to read a file but not allowing it to make a system call to open a new network connection (such as a reverse shell).
These profiles are helpful because they reduce attackers' ability to execute malicious commands whilst maintaining the application's functionality. For example, a Seccomp profile for a web server may look like the following:
{
  "defaultAction": "SCMP_ACT_ALLOW",
  "architectures": [
    "SCMP_ARCH_X86_64",
    "SCMP_ARCH_X86",
    "SCMP_ARCH_X32"
  ],
  "syscalls": [
    { "names": [ "read", "write", "exit", "exit_group", "open", "close", "stat", "fstat", "lstat", "poll", "getdents", "munmap", "mprotect", "brk", "arch_prctl", "set_tid_address", "set_robust_list" ], "action": "SCMP_ACT_ALLOW" },
    { "names": [ "execve", "execveat" ], "action": "SCMP_ACT_ERRNO" }
  ]
}
This Seccomp profile:
- Allows files to be read and written to
- Allows a network socket to be created
- But does not allow execution (for example,
execve)
To create a Seccomp profile, you can simply create a profile using your favourite text editor. This room will use nano. An example Seccomp profile (profile.json) has been provided below. This profile will allow reading and writing access to files but no network connections.
{
  "defaultAction": "SCMP_ACT_ALLOW",
  "architectures": ["SCMP_ARCH_X86_64"],
  "syscalls": [
    {
      "name": "socket",
      "action": "SCMP_ACT_ERRNO",
      "args": []
    },
    {
      "name": "connect",
      "action": "SCMP_ACT_ERRNO",
      "args": []
    },
    {
      "name": "bind",
      "action": "SCMP_ACT_ERRNO",
      "args": []
    },
    {
      "name": "listen",
      "action": "SCMP_ACT_ERRNO",
      "args": []
    },
    {
      "name": "accept",
      "action": "SCMP_ACT_ERRNO",
      "args": []
    }
    {
      "name": "read",
      "action": "SCMP_ACT_ALLOW",
      "args": []
    },
    {
      "name": "write",
      "action": "SCMP_ACT_ALLOW",
      "args": []
    }
  ]
}
With our Seccomp profile now created, we can apply it to our container at runtime by using the --security-opt seccomp flag with the location of the Seccomp profile. For example:
cmnatic@thm:~# docker run --rm -it --security-opt seccomp=/home/cmnatic/container1/seccomp/profile.json mycontainer
Docker already applies a default Seccomp profile at runtime. However, this may not be suitable for your specific use case, especially if you wish to harden the container further while maintaining functionality. You can learn more about using Seccomp with Docker here.
AppArmor
AppArmor is a similar security feature in Linux because it prevents applications from performing unauthorised actions. However, it works differently from Seccomp because it is not included in the application but in the operating system.
This mechanism is a Mandatory Access Control (MAC) system that determines the actions a process can execute based on a set of rules at the operating system level. To use AppArmor, we first need to ensure that it is installed on our system:
cmnatic@thm:~# sudo aa-status
apparmor module is loaded.
34 profiles are loaded.
With the output "apparmor module is loaded", we can confirm that AppArmor is installed and enabled. To apply an AppArmor profile to our container, we need to do the following:
- Create an AppArmor profile
- Load the profile into AppArmor
- Run our container with the new profile
First, let's create our AppArmor profile. You can use your favourite text editor for this. Note that there are tools out there that can help generate AppArmor profiles based on your Dockerfile. However, this is out-of-scope for this room and can be "unreliable".
Provided below is an example AppArmor profile (profile.json) for an "Apache" web server that:
- Can read files located in /var/www/, /etc/apache2/mime.types and /run/apache2.
- Read & write to /var/log/apache2.
- Bind to a TCP socket for port 80 but not other ports or protocols such as UDP.
- Cannot read from directories such as /bin, /lib, /usr.
/usr/sbin/httpd {

  capability setgid,
  capability setuid,

  /var/www/** r,
  /var/log/apache2/** rw,
  /etc/apache2/mime.types r,

  /run/apache2/apache2.pid rw,
  /run/apache2/*.sock rw,

  # Network access
  network tcp,

  # System logging
  /dev/log w,

  # Allow CGI execution
  /usr/bin/perl ix,

  # Deny access to everything else
  /** ix,
  deny /bin/**,
  deny /lib/**,
  deny /usr/**,
  deny /sbin/**
}
Now that we have created the AppArmor profile, we will need to import this into the AppArmor program to be recognised.
cmnatic@thm:~# sudo apparmor_parser -r -W /home/cmnatic/container1/apparmor/profile.json
With our AppArmor profile now imported, we can apply it to our container at runtime by using the --security-opt apparmor flag with the location of the AppArmor profile. For example:
cmnatic@thm:~# docker run --rm -it --security-opt apparmor=/home/cmnatic/container1/apparmor/profile.json mycontainer
Just like Seccomp, Docker already applies a default AppArmor profile at runtime. However, this may not be suitable for your specific use case, especially if you wish to harden the container further while maintaining functionality. You can learn more about using AppArmor with Docker here.
What's the Difference
Well, to put it briefly:
- AppArmor determines what resources an application can access (i.e., CPU, RAM, Network interface, filesystem, etc) and what actions it can take on those resources.
- Seccomp is within the program itself, which restricts what system calls the process can make (i.e. what parts of the CPU and operating system functions).
It's important to note that it is not a "one or the other" case. Seccomp and AppArmor can be combined to create layers of security for a container.
If we wanted to enforce the container to only be able to read files located in /home/tryhackme, what type of profile would we use? Seccomp or AppArmor?
AppArmor
If we wanted to disallow the container from a system call (such as clock_adjtime), what type of profile would we use? Seccomp or AppArmor?
Seccomp
Finally, what command would we use if we wanted to list the status of AppArmor?
aa-status
Task 6 Reviewing Docker Images
Reviewing Docker images is an extremely important habit to practice. You would be wary of running unknown code on your device, so why would you consider running it in a production environment?
Unfortunately, there are numerous examples of malicious Docker images causing havoc. For instance, in 2020, Palo Alto discovered cryptomining Docker images that were pulled (and presumably ran) over two million times.
Images on Docker Hub often come with the Dockerfiles attached to the repository. For example, the Docker Hub displays the layers (therefore the commands executed) of the Dockerfile.
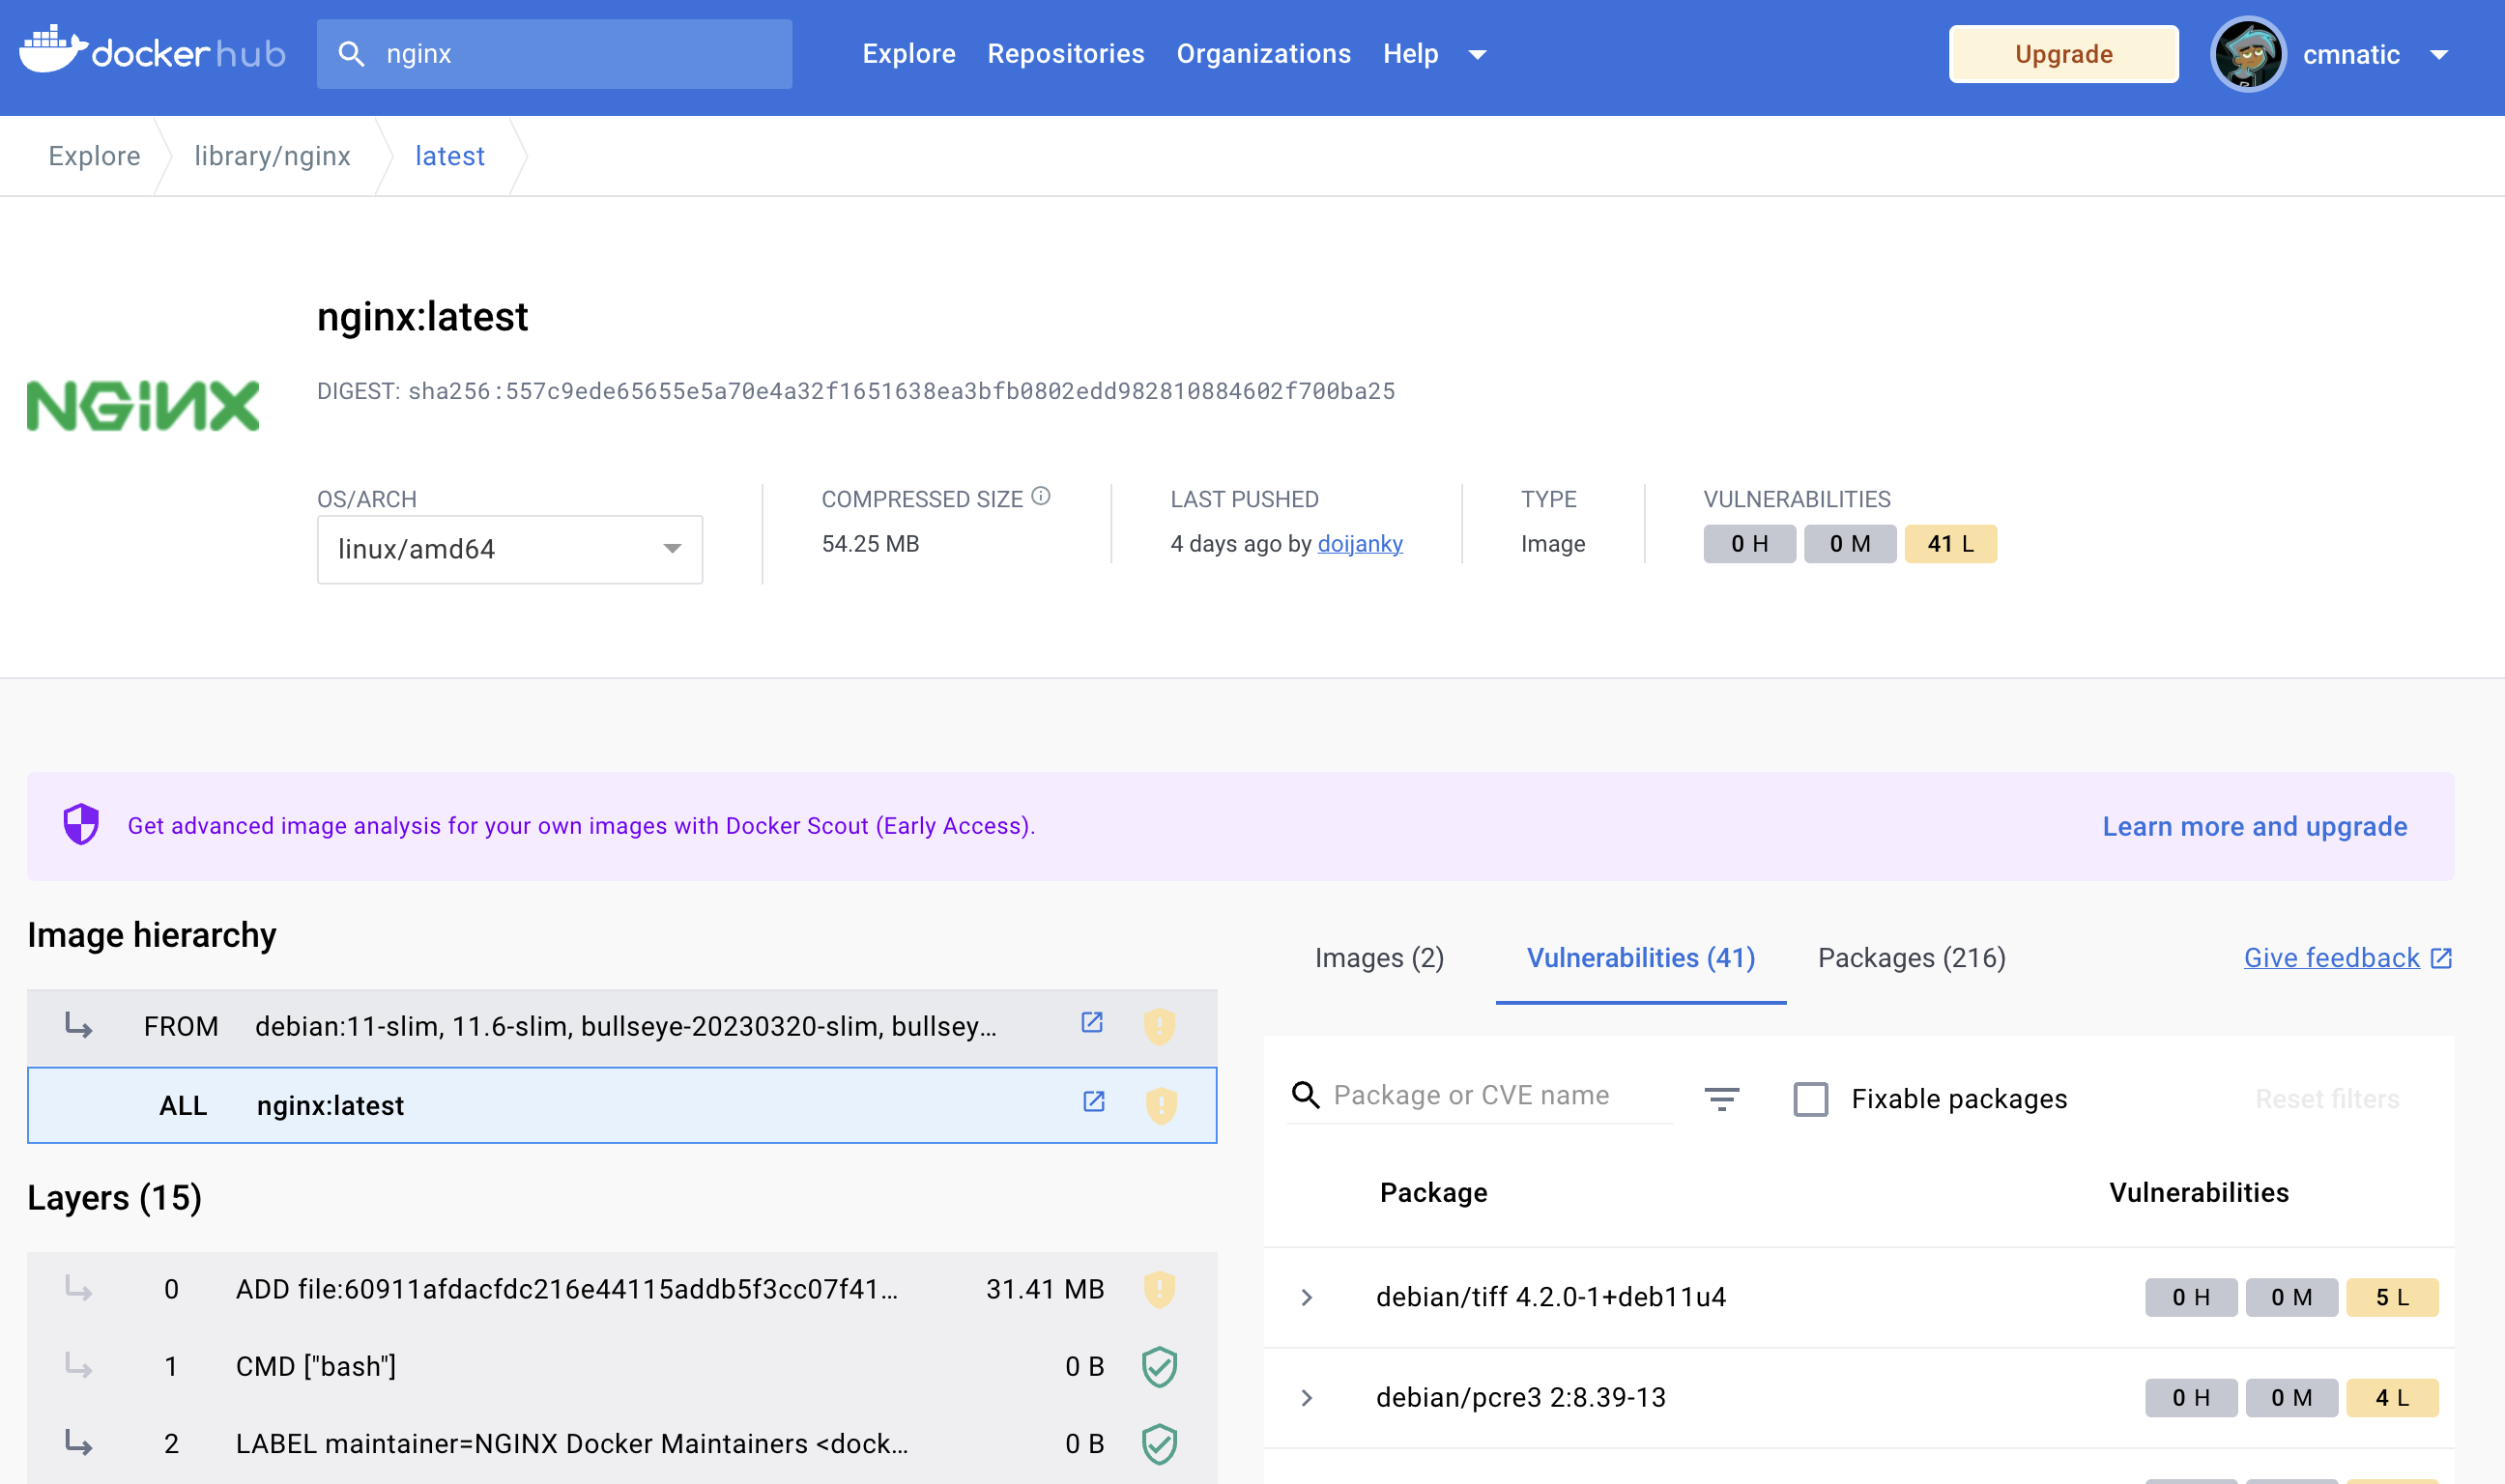
In the image above, we can see the various layers of the image on DockerHub. These layers are the steps that are executed during the building process of the image.
Additionally, open-source code repositories for images on the Docker Hub will often be included, allowing you to review the entire Dockerfile.
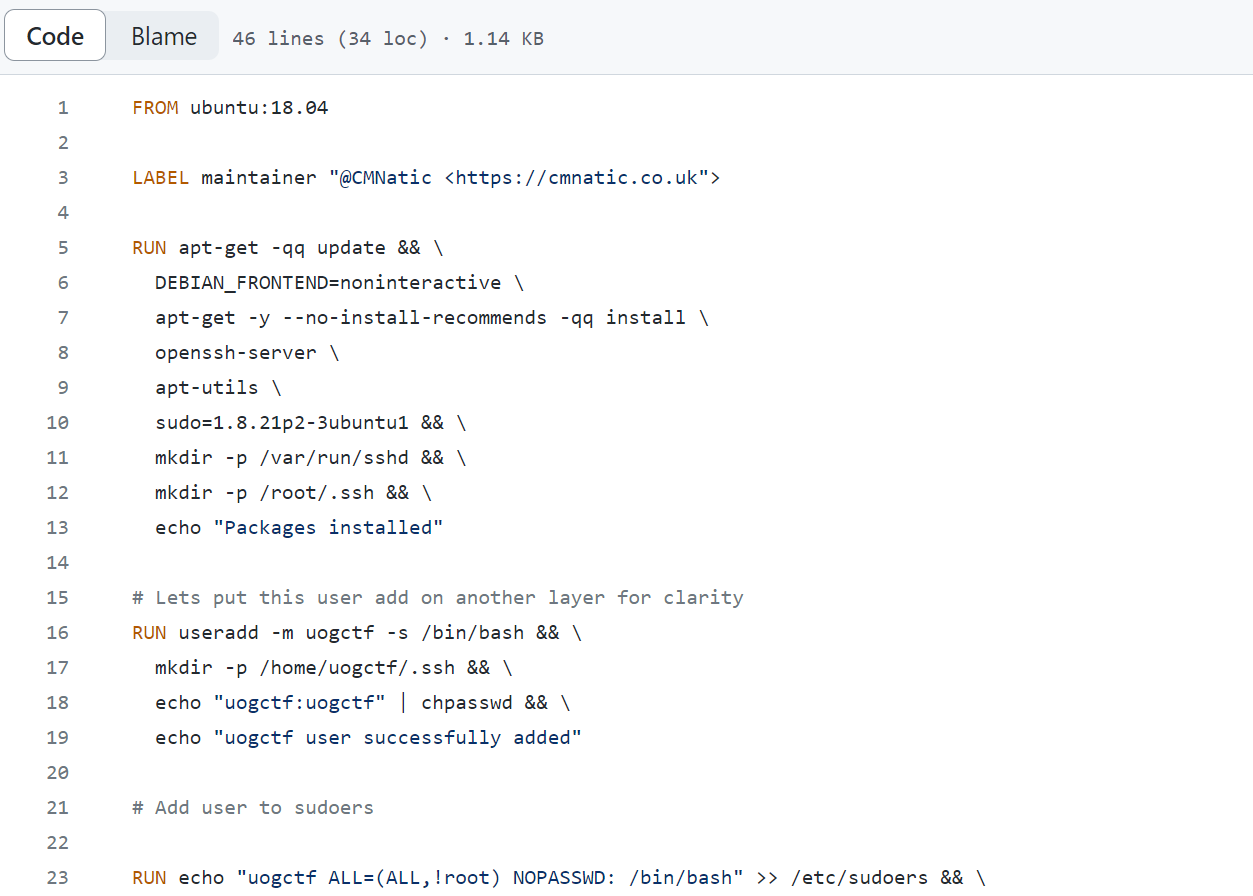
In the image above, we can see the code for the Dockerfile. This allows us to audit the code and understand precisely what actions are being executed in the container. By analysing the code, we can check for vulnerabilities or malicious actions.
Tools such as Dive allow you to reverse engineer Docker images by inspecting what is executed and changed at each layer of the image during the build process.
I understand how I can review both Dockerfiles and Docker images! Complete me to proceed to the next task.
No answer needed
Task 7 Compliance & Benchmarking
Compliance and benchmarking play vital roles in securing assets - let alone containers. Let us begin by explaining compliance. Compliance is the process of following regulations and standards such as the NIST SP 800-190, a set of standards from the National Institute of Standards and Technology that gives guidance and best practices on container security:
| Compliance Framework | Description | URL |
|---|---|---|
| NIST SP 800-190 | This framework outlines the potential security concerns associated with containers and provides recommendations for addressing these concerns. | https://csrc.nist.gov/publications/detail/sp/800-190/final |
| ISO 27001 | This framework is an international standard for information security. The standard guides implementing, maintaining and improving an information security management system. | https://www.iso.org/standard/27001 |
Please note that you may have to adhere to additional frameworks relevant to your Industry. For example, financial or medical. Regulations exist in all industries. For example, in the medical field, the HIPPA for handling medical data.
Benchmarking, on the other hand, is a process used to see how well an organisation is adhering to best practices. Benchmarking allows an organisation to see where they are following best practices well and where further improvements are needed:
| Benchmarking Tool | Description | URL |
|---|---|---|
| CIS Docker Benchmark | This tool can assess a container's compliance with the CIS Docker Benchmark framework. | https://www.cisecurity.org/benchmark/docker |
| OpenSCAP | This tool can assess a container's compliance with multiple frameworks, including CIS Docker Benchmark, NIST SP-800-190 and more. | https://www.open-scap.org/ |
| Docker Scout | This tool is a cloud-based service provided by Docker itself that scans Docker images and libraries for vulnerabilities. This tool lists the vulnerabilities present and provides steps to resolve these. | https://docs.docker.com/scout/ |
| Anchore | This tool can assess a container's compliance with multiple frameworks, including CIS Docker Benchmark, NIST SP-800-190 and more. | https://github.com/anchore/anchore-engine |
| Grype | This tool is a modern and fast vulnerability scanner for Docker images | https://github.com/anchore/grype |
An example of using the Docker Scout tool to analyse a Docker image has been provided in the terminal below. Please note this will need to be installed beforehand. You can read the Docker Scout documentation to learn more.
cmnatic@thm:~# docker scout cves local://nginx:latest
    ✓ SBOM of image already cached, 215 packages indexed
    ✗ Detected 22 vulnerable packages with a total of 45 vulnerabilities

## Overview
                    │       Analyzed Image
────────────────────┼──────────────────────────────
  Target            │  local://nginx:latest
    digest          │  4df6f9ac5341
    platform        │ linux/amd64
    vulnerabilities │    0C     1H    18M    28L
    size            │ 91 MB
    packages        │ 215

## Packages and Vulnerabilities
   0C     1H     1M     3L  glibc 2.35-0ubuntu3.1
pkg:deb/ubuntu/glibc@2.35-0ubuntu3.1?os_distro=jammy&os_name=ubuntu&os_version=22.04
    ✗ HIGH CVE-2023-4911
      https://scout.docker.com/v/CVE-2023-4911
      Affected range : <2.35-0ubuntu3.4
      Fixed version  : 2.35-0ubuntu3.4
      CVSS Score     : 7.8
      CVSS Vector    : CVSS:3.1/AV:L/AC:L/PR:L/UI:N/S:U/C:H/I:H/A:H

    ✗ MEDIUM CVE-2023-5156
      https://scout.docker.com/v/CVE-2023-5156
      Affected range : <2.35-0ubuntu3.5
      Fixed version  : 2.35-0ubuntu3.5
      CVSS Score     : 7.5
      CVSS Vector    : CVSS:3.1/AV:N/AC:L/PR:N/UI:N/S:U/C:N/I:N/A:H

    ✗ LOW CVE-2016-20013
      https://scout.docker.com/v/CVE-2016-20013
      Affected range : >=0
      Fixed version  : not fixed
      CVSS Score     : 7.5
      CVSS Vector    : CVSS:3.1/AV:N/AC:L/PR:N/UI:N/S:U/C:N/I:N/A:H

    ✗ LOW CVE-2023-4813
      https://scout.docker.com/v/CVE-2023-4813
      Affected range : <2.35-0ubuntu3.5
      Fixed version  : 2.35-0ubuntu3.5
      CVSS Score     : 5.9
      CVSS Vector    : CVSS:3.1/AV:N/AC:H/PR:N/UI:N/S:U/C:N/I:N/A:H

    ✗ LOW CVE-2023-4806
      https://scout.docker.com/v/CVE-2023-4806
      Affected range : <2.35-0ubuntu3.5
      Fixed version  : 2.35-0ubuntu3.5
      CVSS Score     : 5.9
      CVSS Vector    : CVSS:3.1/AV:N/AC:H/PR:N/UI:N/S:U/C:N/I:N/A:H
What is the name of the framework published by the National Institute of Standards and Technology?
For this answer, be sure to include the full name.
NIST SP 800-190
What is the name of the analysis tool provided by Docker?
Docker Scout
Task 8 Practical
Deploy the machine attached to this task by pressing the green Start Machine button. The machine will start in split-view. If it’s not showing up, you can press the blue Show Split View button at the top-right of the page. Your task is to use the Grype vulnerability scanner on the machine to analyse some Docker images.
Grype can be used to analyse Docker images and container filesystems. You can refer to the table below as a cheat sheet to answer the questions in this task.
| Example | Description | Command |
|---|---|---|
| Scanning a Docker image | Scan a Docker image for vulnerabilities. | grype imagename --scope all-layers |
| Scanning an exported container filesystem | Scan an exported container filesystem (i.e. from docker image save). | grype /path/to/image.tar |
Please note, that for this room, you can safely ignore the "Unable to check for vulnerability database update" warning messages.
Use Docker to list the running containers on the system. What is the name of the container that is currently running?
couchdb
Use Grype to analyse the "struts2" image. What is the name of the library marked as "Critical"?
struts2-core
Use Grype to analyse the exported container filesystem located at /root/container.tar. What severity is the "CVE-2023-45853" rated as?
Critical