Intro to Kubernetes
Task 1 Introduction
Kubernetes, Kubernetes, Kubernetes. This word is very popular in the DevSecOps space. This word and the technology it represents, of course. This room is going to tell you why this is. We will take that mysterious word that everyone seems to love so much and turn it into a familiar term by walking you through Kubernetes fundamentals, with a dash of secure K8s practices, and a sprinkle of hands-on experience to top it off. To start dispelling that mystery and save you from thinking "What the hell is a 'Keights'?". Kubernetes is sometimes referred to as K8s (a numeronym) - anything to save time in this industry!
Learning Prerequisites
This room will continue the DevSecOps path, so all previous DevSecOps modules should be completed, especially the two rooms before this one in the Container Security module (Intro to Containerisation and Intro to Docker) should be done.
Learning Objectives
- Understand why a system like Kubernetes is needed
- Understand basic Kubernetes architecture
- Understand key components of the Kubernetes landscape
- Understand how to traverse a Kubernetes cluster using kubectl
- Understand how Kubernetes is used by DevSecOps engineers and best K8s security practices
Let's go!
No answer needed
Task 2 Kubernetes 101
A New Dawn
To better understand Kubernetes, let us first consider the context of its emergence. In other words, why was it needed in the first place? Back in the day, it was more common for companies to have a monolithic architecture. That is, an application is built as a single unit, a single code base, and usually, a single executable deployed as a single component. This worked and still works for a lot of companies; however, some companies started to switch to a microservices architecture, so instead of having one monolithic application, it would be broken down into different components, each of these components usually having different business functions, meaning high demand business functions can be scaled without having to scale the entire application. One high-profile example of this happened in 2009 (before microservices even had a name) when Netflix had issues meeting their increased demands with their monolithic architecture, and so began the adoption of microservices architecture.
Microservices architecture is now an increasingly popular approach, and the reason why this is so important for today's lesson is that container technologies offer the perfect host for these microservices. With microservices architecture often comprising hundreds or even thousands of these containers, there was a need for a technology to help manage and organise them - no prizes for guessing what technology came to the rescue.
Enter Kubernetes
Let's start with the big question, shall we? What is Kubernetes? In the previous rooms in this module, we discussed containers and Docker, so let's use that as our jumping-off point. Imagine you have a Docker container that is running an app that can be accessed externally. Suddenly, this application starts receiving a lot of traffic, so a new container with this application needs to be spun up so the traffic can be distributed between the two. This is where Kubernetes comes in as a container orchestration system. The term "orchestration" conjures up images of a literal orchestra. This metaphor does have some traction, with the containers being like instruments and Kubernetes being the conductor in control of the flow. It would just be a very strange orchestra where the conductor tells the players to leave when they're no longer needed for the song and brings new ones on when they are.
The Many Benefits of Kubernetes
Now that we've established what Kubernetes is and why it’s needed, let's look at how this technology can benefit the DevSecOps space.
- Kubernetes makes an application highly available and scalable. It does this by, for example, duplicating an application (and its db component) and load balancing external requests to this application to an available resource, therefore removing a single point of failure from the architecture and removing bottlenecks, which can slow down application response times. As mentioned earlier, scalability is a big concern for many companies; Kubernetes allows workloads to be scaled up or down to match demand.
- Kubernetes is also highly portable in that it can be run anywhere with nearly any type of infrastructure and can be used with a single or multi-cloud set, making it a very flexible tool.
- Another benefit of Kubernetes is its popularity; because of this, many technologies are compatible with it and can be used to make each tool more powerful.
These are just a few ways Kubernetes benefits the DevSecOps space, and it explains why that word is thrown around so much!
Which benefit of Kubernetes means that it can run anywhere on any type of infrastructure?
highly portable
Fill in the blank "Kubernetes is a _________ _____________ system".
container orchestration
Task 3 Kubernetes Architecture
Cluster Architecture
Okay, so we've learned what Kubernetes is, why it's needed and how it can benefit us in DevSecOps. Now, it's time to deepen our understanding by looking under the hood and analysing how it can do what it does. That's right! It's architecture time! We will go through each key component that makes up Kubernetes architecture, one by one, before putting it all together at the end and showing how all these components connect. Let's get into it!
Kubernetes Pod
Pods are the smallest deployable unit of computing you can create and manage in Kubernetes. When you work in DevSecOps with Kubernetes, you'll hear a lot of this word. You can think of a pod as a group of one or more containers. These containers share storage and network resources. Because of this, containers on the same pod can communicate easily as if they were on the same machine whilst maintaining a degree of isolation. Pods are treated as a unit of replication in Kubernetes; if a workload needs to be scaled up, you will increase the number of pods running.
Kubernetes Nodes
Kubernetes workloads (applications) are run inside containers, which are placed in a pod. These pods run on nodes. When talking about node architecture, there are two types to consider. The control plane (also known as "master node") and worker nodes. Both of these have their own architecture/components, so let's take a look at them. Nodes can either be a virtual or physical machine. Think of it this way: if applications run in containers which are placed in a pod, nodes contain all the services necessary to run pods.
Kubernetes Cluster
At the highest level, we have our Kubernetes Cluster; put simply, a Cluster is just a set of nodes.
The Kubernetes Control Plane
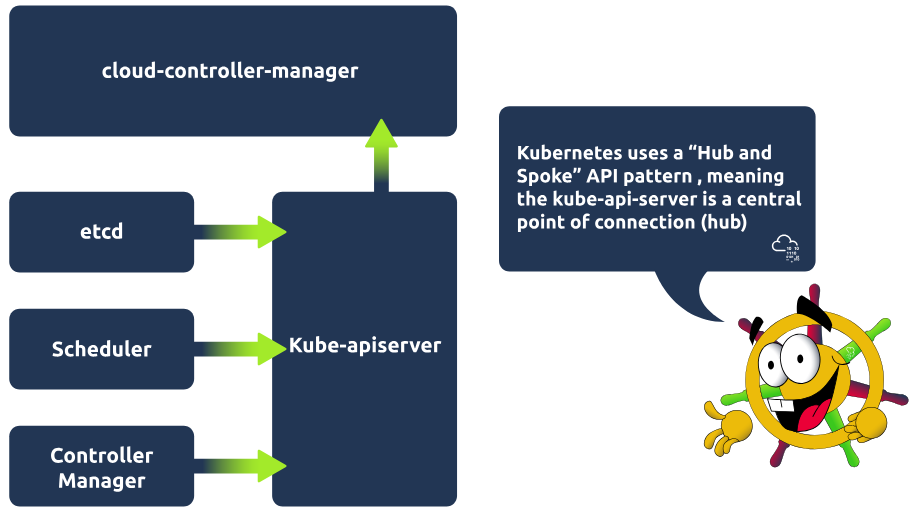
The control plane manages the worker nodes and pods in the cluster. It does this with the use of various components. Take a look at each of the components and what they are responsible for. Then see them all put together in a control plane architecture diagram.
Kube-apiserver
The API server is the front end of the control plane and is responsible for exposing the Kubernetes API. The kube-apiserver component is scalable, meaning multiple instances can be created so traffic can be load-balanced.
Etcd
Etcd is a key/value store containing cluster data / the current state of the cluster. It is highly available and consistent. If a change is made in the cluster, for example, another pod is spun up, this will be reflected in the key/value store, etcd. The other control plane components rely on etcd as an information store and query it for information such as available resources.
Kube-scheduler
The kube-scheduler component actively monitors the cluster. Its job is to catch any newly created pods that have yet to be assigned to a node and make sure it gets assigned to one. It makes this decision based on specific criteria, such as the resources used by the running application or available resources on all worker nodes.
Kube-controller-manager
This component is responsible for running the controller processes. There are many different types of controller processes, but one example of a controller process is the node controller process, which is responsible for noticing when nodes go down. The controller manager would then talk to the scheduler component to schedule a new node to come up.
Cloud-controller-manager
This component enables communication between a Kubernetes cluster and a cloud provider API. The purpose of this component is to allow the separation of components that communicate internally within the cluster and those that communicate externally by interacting with a cloud provider. This also allows cloud providers to release features at their own pace.
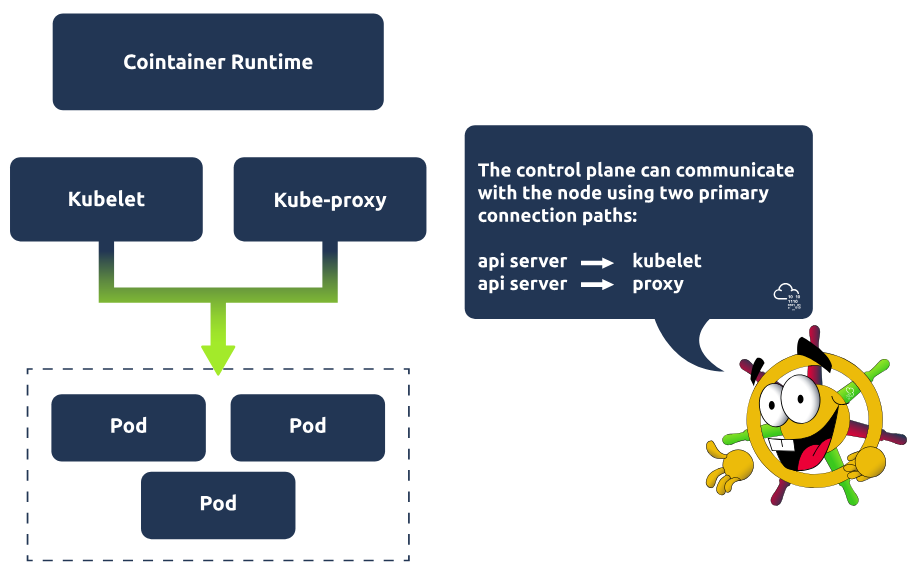
Kubernetes Worker Node
Worker nodes are responsible for maintaining running pods. Let's take a look at the components, which are present on every worker node, and what they are responsible for:
Kubelet
Kubelet is an agent that runs on every node in the cluster and is responsible for ensuring containers are running in a pod. Kubelet is provided with pod specifications and ensures the containers detailed in this pod specification are running and healthy! It executes actions given to it by the controller manager, for example, starting the pod with a container inside.
Kube-proxy
Kube-proxy is responsible for network communication within the cluster. It makes networking rules so traffic can flow and be directed to a pod (from inside or outside of the cluster). Traffic won't hit a pod directly but instead hit something called a Service (which would be associated with a group of pods), and then gets directed to one of the associated pods. More on services in the next task!
Container runtime
Pods have containers running inside of them. A container runtime must be installed on each node for this to happen. So far, we have covered one example of this in this module, which is probably the most popular choice, Docker. However, some alternatives can be used, such as rkt or runC.
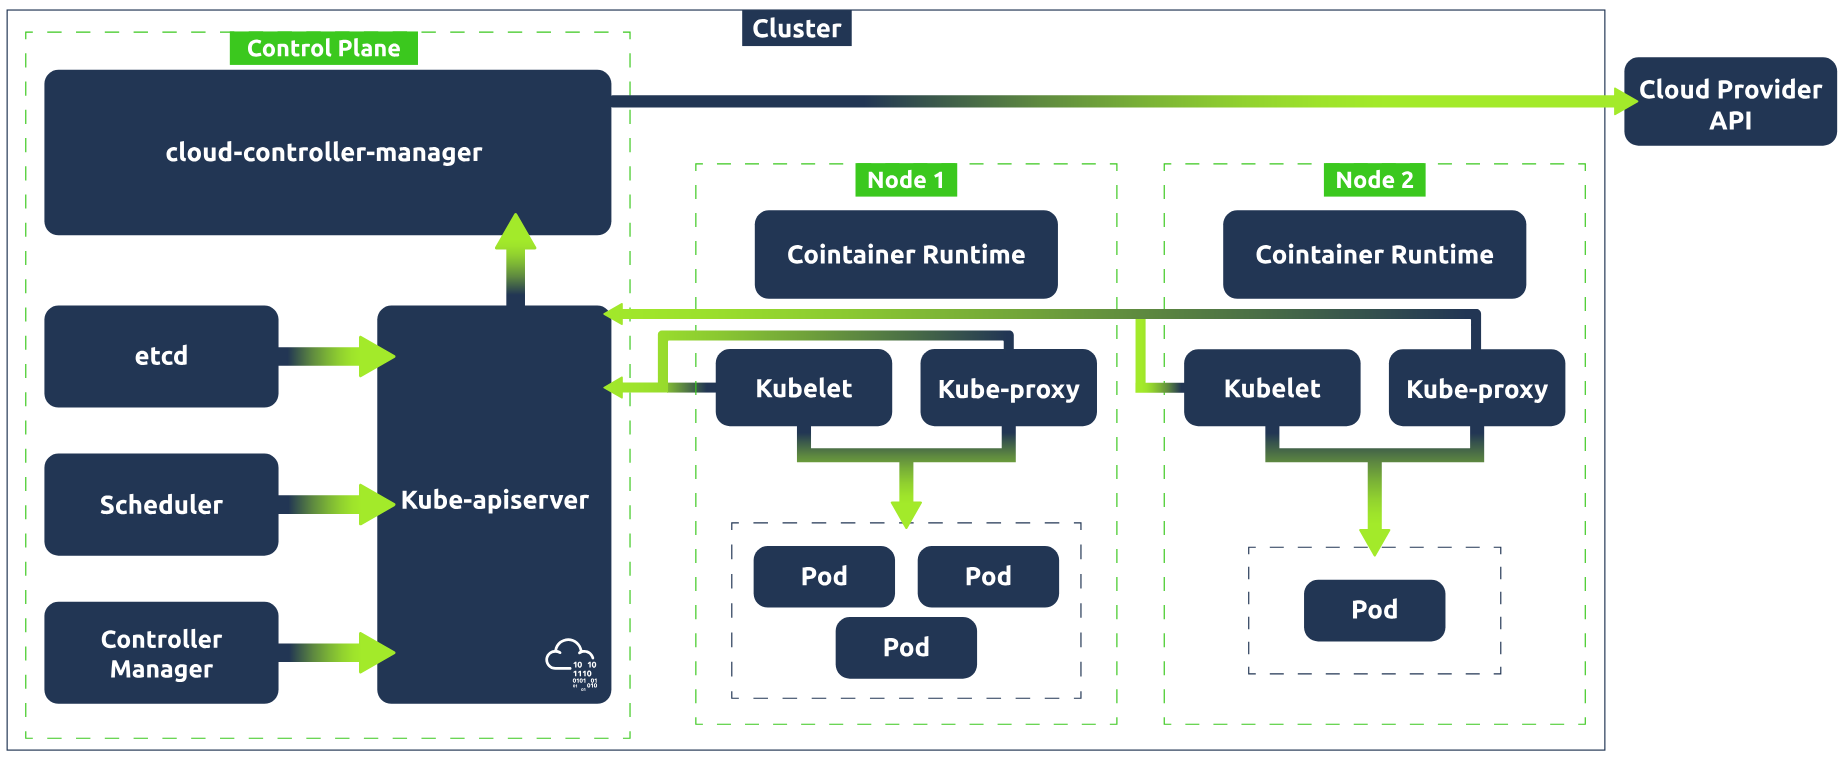
Communication Between Components
Okay, so we've covered a lot there. Let's take a step and look at how all those individual components we've just covered work together to make up Kubernetes architecture. A Kubernetes cluster contains nodes and Kubernetes runs a workload by placing containers into pods that run on these nodes. Take a look at the graphic below to see how all these components come together.
What is the smallest deployable unit of computing you can create in Kubernetes?
pod
Which control plane component is a key/value store which contains data pertaining to the cluster and its current state?
etcd
Which worker node component is responsible for network communication within the cluster?
kube-proxy
Task 4 Kubernetes Landscape
The Lay of the Land
So we've just looked at Kubernetes architecture and how things work and are set up behind the scenes! Now it's time to show you the lay of the land. In other words, what, as a DevSecOps engineer, would you be interacting with daily? We will go through some of the most common concepts in Kubernetes and break down what they are.
Namespaces
In Kubernetes, namespaces are used to isolate groups of resources in a single cluster. For example, say you want to group resources associated with a particular component, or if you are using a cluster to host multiple tenants, to group resources by tenant. Resources must be uniquely named within a namespace, but the same resource name can be used across various namespaces.
ReplicaSet
As the name suggests, a ReplicaSet in Kubernetes maintains a set of replica pods and can guarantee the availability of x number of identical pods (identical pods are helpful when a workload needs to be distributed between multiple pods). ReplicaSets usually aren't defined directly (neither are pods, for that matter) but are instead managed by a deployment, which brings us to our next concept.
Deployments
Deployments in Kubernetes are used to define a desired state. Once this desired state is defined, the deployment controller (one of the controller processes) changes the actual state to the desired state. Deployments provide declarative updates for pods and replica sets. In other words, as a user, you can define a deployment, let's say, for example, "test-nginx-deployment". In the definition, you can note that you want this deployment to have a ReplicaSet comprising three nginx pods. Once this deployment is defined, the ReplicaSet will create the pods in the background.
StatefulSets
To understand what Kubernetes Statefulsets are, you must first understand the difference between stateful and stateless apps. Stateful apps store and record user data, allowing them to return to a particular state. For example, suppose you have an open session using an email application and read 3 emails, but your session is interrupted. In that case, you can reload this application, and the state will have saved, ensuring these 3 emails are still read. Stateless applications, however, have no knowledge of any previous user interactions as it does not store user session data. For example, think of using a search engine to ask a question. If that session were to be interrupted, you would start the process again by searching the question, not relying on any previous session data.
For these stateless applications (search engine example), deployments can be used to define and manage pod replicas. Because of the application's stateless nature, replicas can be created with random pod names, and when removed, a pod can be deleted at random.
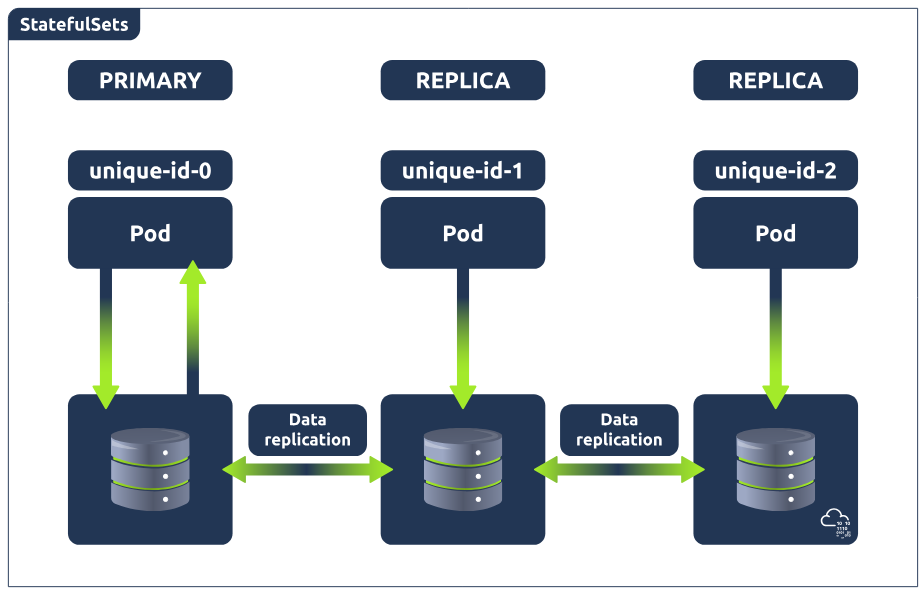
However, this is not the case for stateful applications (email example), because stateful applications need to access and update the current state of the user session. Imagine this current state is being stored in a database running across 3 pods (meaning the database is replicated 3 times). Now, what happens when one of the databases is updated? This would leave 2 of the databases out of sync. This is where StatefulSets come in and is why you would use that instead of a deployment to manage stateful applications in Kubernetes.
Statefulsets enable stateful applications to run on Kubernetes, but unlike pods in a deployment, they cannot be created in any order and will have a unique ID (which is persistent, meaning if a pod fails, it will be brought back up and keep this ID) associated with each pod. In other words, these pods are created from the same specification but are not interchangeable. StatefulSets will have one pod that can read/write to the database (because there would be absolute carnage and all sorts of data inconsistency if the other pods could), referred to as the master pod. The other pods, referred to as slave pods, can only read and have their own replication of the storage, which is continuously synchronised to ensure any changes made by the master node are reflected.
Services
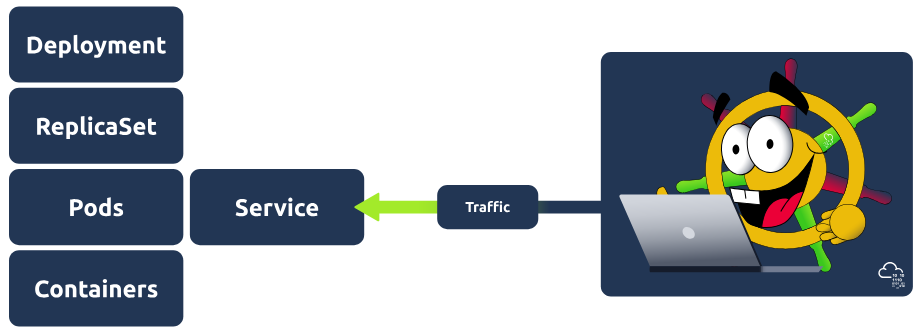
To best understand services in Kubernetes, it's important to understand the problem they are solving. Kubernetes pods are ephemeral, meaning they have a short lifespan and are spun up and destroyed regularly. Imagine now a connection needs to be made to these pods. This could be from within the cluster; maybe a back-end application is running in these pods, and a front-end application needs to access them, or perhaps the request is coming from a browser, and these pods are running a web application. For this connection to happen, an IP address is required. If IP addresses were tied to pods, then these IP addresses would change frequently, causing all kinds of issues; services are used so that a single static IP address can be associated with a pod and its replicas. In other words, a service is placed in front of these pods and exposes them, acting as an access point. Having this single access point allows for requests to be load-balanced between the pod replicas. There are different types of services you can define: ClusterIP, LoadBalancer, NodePort and ExternalName. To learn more about these types and services in general, check out here.

Ingress
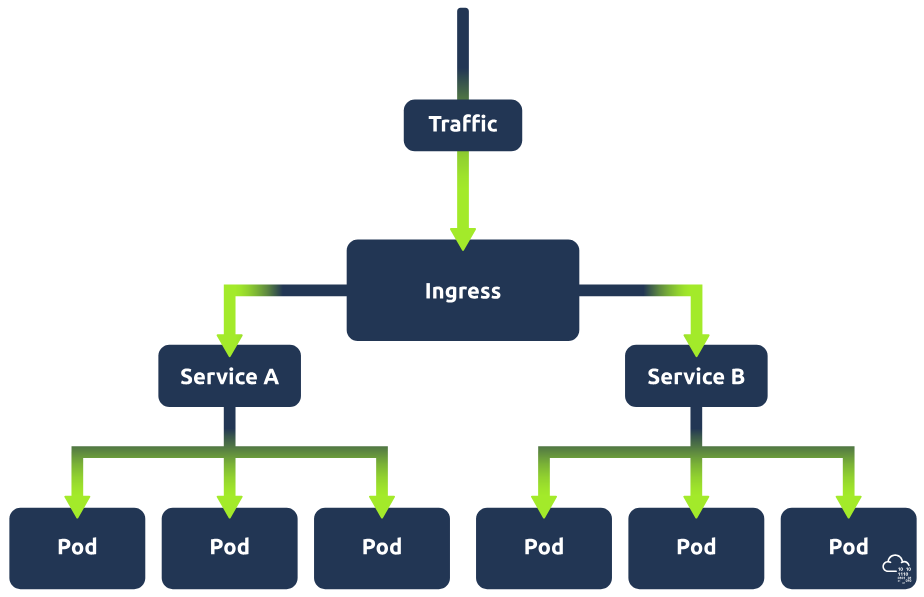
In the above section on Kubernetes services, we mentioned an example of an application which can be made accessible by using a service to expose the pods running this application (let's call this service A). Imagine now that this web application has a new feature. This new feature requires its own application and so has its own set of pods, which are being exposed by a separate service (let's call this service B). Now, let's say a user requests to access this new feature of the web application; there will need to be some kind of traffic routing in place to ensure this request gets directed to service B. That is where ingress comes in. Ingress acts as a single access point to the cluster and means that all routing rules are in a single resource.
DevOps vs. DevSecOps in K8s
This task has shown you some of the Kubernetes resources that work together to make a cluster. Next up, we're going to discuss how we interact with this cluster to create these components, but before we do that, this would be a good moment to discuss the division of labour in the world of K8s. It's important to understand, especially when learning for a certain career path, the difference between DevOps and DevSecOps responsibilities. At a very high level, you can think of DevOps tasks as those associated with building a cluster and DevSecOps tasks as those associated with securing a cluster. There will, of course, be some overlap depending on company architecture or corporate set-up, but generally, these tasks can be defined as one or the other. As this room serves as an introduction, it begins by showing you the building blocks of a Kubernetes cluster and how to interact with these resources (DevOps tasks). As this knowledge is foundational, understanding these concepts will help you in the later tasks when we discuss securing the cluster (DevSecOps tasks). That being said, as mentioned, the distinction is important, especially for those pursuing a specific career path, so keep this in mind going forward!
Which Kubernetes component exposes pods and serves as an access point?
Service
Which Kubernetes component can guarantee the availability of X number of pods?
ReplicaSet
What Kubernetes component is used to define a desired state?
Deployments
Task 5 Kubernetes Configuration
Time to Configure
Now that we've covered some of the key components used in Kubernetes, let's combine some of them and walk you through how this would be configured! The example we will use is a deployment which controls a ReplicaSet, which manages pods exposed by a service.
To configure this setup, we would require two configuration files, one for the deployment and one for the service. Before giving you an example of how each of these files works, let's go over some of the basics of configuration in Kubernetes that will be consistent across these two files (and all configuration files, for that matter).
First, let's discuss the file format. Kubernetes config files are typically written in YAML. They can also be made interchangeably using the JSON format, but as per the Kubernetes documentation, it is generally considered best practice to use YAML given its easy, human-readable nature (just gotta keep an eye on that indentation!).
Required Fields
Next, let's discuss the four fields which must be present in each of the YAML files, breaking down what will need to be included in each one:
apiVersion: The version of the Kubernetes API you are going to use to create this object. The API version you use will depend on the object being defined. A cheatsheet for what API version to use for which object can be found here.
kind: What kind of object you are going to create (e.g. Deployment, Service, StatefulSet).
metadata: This will contain data that can be used to uniquely identify the object (including name and an optional namespace).
spec: The desired state of the object (for deployment, this might be 3 nginx pods).
Configuring Resources
Those are the very basics of Kubernetes YAML configuration files. Let's consider those and look now at the two files mentioned above. We're going to take a look at the service config file first, as when defining a deployment and service, it is generally best practice to first define the service before the back-end deployment/replicaset that it points to (this is because when Kubernetes starts a container, it creates an env variable for each service that was running when a container started). Here is what our example-service.yaml file looks like:
apiVersion: v1
kind: Service
metadata:
  name: example-nginx-service
spec:
  selector:
    app: nginx
  ports:
    - protocol: TCP
      port: 8080
      targetPort: 80
  type: ClusterIP
Let's break that down: apiVersion is set to v1 (the version of the Kubernetes API best used for this simple service example), and kind is set to service. For the metadata, we just called this service "example-nginx-service". The spec is where it gets more interesting, under 'selector', we have 'app: nginx'. This is going to be important going forward when we define our deployment configuration, as is the ports information, as we are essentially saying here: "This service will look for apps with the nginx label and will target port 80. An important distinction to make here is between the 'port' and 'targetPort' fields. The 'targetPort' is the port to which the service will send requests, i.e., the port the pods will be listening on. The 'port' is the port the service is exposed on. Finally, the 'type' is defined as ClusterIP (earlier, we discussed that there were multiple types of services, and this is one of them), which is the default service type. Now let's take a look at the Deployment YAML and define the back end which this service will point to:
apiVersion: apps/v1
kind: Deployment
metadata:
  name: example-nginx-deployment
spec:
  replicas: 3
  selector:
    matchLabels:
      app: nginx
  template:
    metadata:
      labels:
        app: nginx
    spec:
      containers:
      - name: nginx
        image: nginx:latest
        ports:
        - containerPort: 80
The first thing you might notice is that inside the 'spec' field, there is a nested field called 'template', which itself contains a 'metadata' and 'spec' field. To understand this, remember the image at the start of this task. We are defining a deployment which controls a ReplicaSet; here, in the outer 'spec' field, we tell Kubernetes we want 3 replicas (identical pods) in this ReplicaSet. This template field is the template that Kubernetes will use to create those pods and so requires its own metadata field (so the pod can be identified) and spec field (so Kubernetes knows what image to run and which port to listen on). Note that the port defined here is the same as the one in the service YAML. This is because the service's target port is 80 and needs to match. As well as this, in the outer 'spec' field, you can see we have also set the 'selector' field to have a 'matchLabels', which matches what we defined in the 'selector' field for the service YAML. This is so the service is mapped to the correct pods. With these two config YAML files, we have defined a deployment that controls a ReplicaSet that manages 3 pods, all of which are exposed to a service. It's all coming together!
These config files are used to define the desired state of Kubernetes components; Kubernetes will constantly be checking this desired state against the current state of the cluster. Using the etcd (one of the control plane processes mentioned in an earlier task), Kubernetes populates these configuration files with the current state and does this comparison. For example, if we have told Kubernetes we want 3 nginx pods running, and it detects in the status that there are only 2 running pods, it will begin the actions to correct this.
In a config file, you have just declared that you want 4 nginx pods. In which one of the 'required fields' has this been declared?
spec
The configuration file is for a deployment. In which one of the 'required fields' is this declared?
kind
The pods in this deployment will be exposed by a service. In the service configuration file, the target port was set to 80. What should you put as the 'containerPort'?
80
Task 6 Kubectl
Kubectl to the Rescue
We've just covered how to define the desired state of your cluster using YAML config files, but currently, those exist only as files. To take these from configurations to running processes, we need to interact with the cluster. We can do this by interacting with the apiserver component of the control plane using different methods: UI if using the Kubernetes dashboard, API if using some sort of script or command line using a tool called kubectl. This task focuses on the last of these. Simply put, kubectl is a command line tool provided by Kubernetes that allows us to communicate with a Kubernetes cluster's control plane and is a great addition to your DevSecOps arsenal. This task will show you how to take the config files outlined in the previous task and apply them, as well as give you some boot camp training for this tool, teaching you some of the basic commands so you can navigate a Kubernetes cluster like it's your back garden!
Kubectl apply
Once you have defined your deployment and service configurations in the YAML file, the next step would be to apply them so Kubernetes can take the desired configuration and turn it into a running process(s). This is done using the aptly named apply command. For example, if applying the service YAML mentioned in the previous task, that would look like this:
kubectl apply -f example-deployment.yaml
Kubectl get
Once both configurations have been applied, you'll want to check the status of both to ensure things are running as expected. This would be done using the Kubectl get command. This is a very versatile command, and you will be using it a lot in your time with Kubernetes. The get command can be used to check the state of resources. The resource type will follow 'get', then -n or --namespace followed by the namespace (unless you are checking a cluster-level resource like a node). For example, to check the state of a deployment, you would use:
kubectl get pods -n example-namespace
The output for this command would look something like this:
user@tryhackme$ kubectl get pods -n example-namespace
NAME          READY   STATUS              RESTARTS   AGE
example-pod   1/1     Running             0          2m18s
As mentioned, this command can be used to check on a variety of resources such as deployments, services, pods, and ReplicaSets.
Kubectl describe
This command can be used to show the details of a resource (or a group of resources). These details can help in troubleshooting or analysis situations. For example, say one of the pods in your cluster has started erroring out, and you want to get more information about the pod to try to determine why it has crashed. You would run the following command:
kubectl describe pod example-pod -n example-namespace
This would give you back some details about the erroring pod. For example:
user@tryhackme$ kubectl describe pod example-pod -n example-namespace

Name:             example-pod
Namespace:        example-namespace
Priority:         0
Service Account:  default
Node:             minikube/192.168.49.2
Start Time:       Mon, 22 Jan 2024 14:01:14 +0000
Labels:           <none>
Annotations:      <none>
Status:           Running
IP:               10.244.0.21
...
...
You can see here that the describe command details contain some "events". These events can help shine a light on what the issue is. For more details surrounding this event, Kubernetes captures logs from each container in a running pod. These logs can be viewed using our next command.
Kubectl logs
Say you want to view the application logs of the erroring pods. Maybe you want to view the logs surrounding the event error. For this, we would use the kubectl logs command. Here is an example of how this would be used:
kubectl logs example-pod -n example-namespace
These logs can provide valuable insight not just for troubleshooting but for security analysis as well.
Kubectl exec
Now, let's say the log information was helpful, but there are still some unanswered questions, and you want to dig deeper and access the container's shell. The kubectl exec command will allow you to get inside a container and do this! If a pod has more than one container, you can specify a container using the -c or --container flag. The command for this is (the -it flag runs the command in interactive mode, everything after -- will be run inside the container):
kubectl exec -it example-pod -n example-namespace -- sh
From here, you can run any command you want from within the container itself. Maybe you want to snoop around for your security analysis or run a command to test connectivity from the container.
Kubectl port-forward
Another handy command is kubectl port-forward. This command allows you to create a secure tunnel between your local machine and a running pod in your cluster. An example of when this might be useful is when testing an application. Let's imagine we have an nginx web application running across 3 pods which are exposed by a web application service. If you remember, a service makes a pod externally accessible. We take the port that is used to expose these pods and map it to one of our local ports. For example, matching the target port (the port the service is exposed on, which in our configuration example was 8080) to local port 8090 would make this web application accessible on our local machine at http://localhost:8090. The resources specified are resource-type/resource-name. This would be done using the kubectl port-forward command with the following syntax :
kubectl port-forward service/example-service 8090:8080
There are, of course, plenty more kubectl commands that can be used to navigate and interact with a Kubernetes cluster, but the ones covered give you a solid foundation, and you can perform some day-to-day DevSecOps tasks using only these. You will get a chance to demo these commands in this room's practical exercise in Task 8.
Now complete these questions: What command would follow 'kubectl' if you wanted to....
...troubleshoot a pod by gathering some details about it?
describe
...access the container's shell?
exec
...check the status of running pods?
get
...turn a defined configuration (YAML file) into a running process?
apply
Task 7 Kubernetes & DevSecOps
Okay, by now, you're getting pretty familiar with Kubernetes; it's becoming less of an acquaintance and more of a friend. You've learned the ins and outs of the tool and will soon get a chance to have a hands-on demo of it, but before any of that, let's look at exactly how YOU would use this tool as a DevSecOps engineer. After all, that's very likely why you're here!
Kubernetes and Security
Before we dive into what a DevSecOps engineer would be responsible for in a Kubernetes cluster, let's consider Kubernetes from a security perspective to give some context. Kubernetes is, relatively speaking, new on the block. That is to say, it is an emerging technology. It's emerging but very popular, with many companies adopting Kubernetes, especially young tech and start-up companies.
Introducing any tool into a system is considered an increased security risk as a new tool means a new potential way into that system. These risks are amplified when dealing with a tool like Kubernetes, where you have a network of pods that can communicate with each other. The default setting allows any pod to communicate with another. This implies all kinds of security considerations. As a DevSecOps engineer, it is your responsibility to ensure these channels are secure.
Kubernetes Hardening
Container hardening is one way in which DevSecOps engineers can secure these channels, and we will dive into that later in this module with the Container Hardening room. It is the process of using container scanning tools to detect CVEs present in a cluster and remediate them to ensure minimal security breach risk.
Kubernetes hardening is precisely that, ensuring these channels are secure by fortifying your cluster following best container security practices that you would perform as a DevSecOps engineer. Various companies and government agencies have defined these best practices; let's go over each area in which we can strengthen our container security and how this can be done.
Secure your Pods
Let's begin with a few ways to secure the pods themselves. Some best practices for pod security include:
- Containers that run applications should not have root privileges
- Containers should have an immutable filesystem, meaning they cannot be altered or added to (depending on the purpose of the container, this may not be possible)
- Container images should be frequently scanned for vulnerabilities or misconfigurations
- Privileged containers should be prevented
- Pod Security Standards and Pod Security Admission
Hardening and Separation of your Network
In the introduction to this task, one thing especially was flagged as a big security risk: communication. That communication happens over a network, and it's your job as a DevSecOps engineer to ensure this communication is secure. This can be done using the following best practices:
- Access to the control plane node should be restricted using a firewall and role-based access control in an isolated network
- Control plane components should communicate using Transport Layer Security (TLS) certificates
- An explicit deny policy should be created
- Credentials and sensitive information should not be stored as plain text in configuration files. Instead, they should be encrypted and in Kubernetes secrets
Using Authentication and Authorisation Optimally
It wouldn't be a security lesson if we didn't talk about authentication and authorisation, of course! Kubernetes is no different. Here are some best practices which can help make sure you are making efficient use of Kubernetes authentication and authorisation features:
- Anonymous access should be disabled
- Strong user authentication should be used
- RBAC policies should be created for the various teams using the cluster and the service accounts utilised
Keeping an Eye Out
You can't rest easy knowing your Kubernetes cluster is secure if you don't know what's going on in your Kubernetes cluster. Here are some logging best practices to ensure you know exactly what is going on in your cluster and can detect threats when they appear:
- Audit logging should be enabled
- A log monitoring and alerting system should be implemented
Security Never Sleeps
This is in no way an endorsement of a sleepless lifestyle; DevSecOps engineers do, in fact, need to sleep! Being secure is one thing, staying secure is another. Here are some best practices to ensure your cluster stays a safe haven:
- Security patches and updates should be applied quickly
- Vulnerability scans and penetration tests should be done semi-regularly
- Any obsolete components in the cluster should be removed
Kubernetes Security Best Practices in Action
The above information tells us there are a lot of ways to harden a Kubernetes infrastructure. There are so many, in fact, that breaking down each practice would turn this room into a self-published e-book. With the opportunity to get your hands on Kubernetes just a task away, let's finish this one by breaking down just three of them.
RBAC
RBAC (Role-Based Access Control) in Kubernetes regulates access to a Kubernetes cluster and its resources based on defined roles and permissions. These permissions (permission to create/delete x resource, etc.) are assigned to users, groups or service accounts. RBAC is a good way to ensure the resources in your cluster can only be accessed by those who need to access it. RBAC can be configured using a YAML file (same as defining a resource) where specific rules can be defined by declaring the resource type and verbs. Verbs are the actions being restricted, such as 'create' and 'get'.
Secrets Management
A Kubernetes secret is an object used to store sensitive information (like credentials, OAuth tokens or SSH keys). Secrets are a good way to ensure that sensitive data isn't leaked and allow for more control over how this information is used. Secrets are stored as a base64 encoded string, unencrypted by default. For security, it is best to configure encryption at rest. Another way to promote secure secrets management in your Kubernetes cluster is to configure the least privilege access to secrets using RBAC.
PSA (Pod Security Admission) and PSS (Pod Security Standards)
Pod Security Standards are used to define security policies at 3 levels (privileged, baseline and restricted) at a namespace or cluster-wide level. What these levels mean:
- Privileged: This is a near unrestricted policy (allows for known privilege escalations)
- Baseline: This is a minimally restricted policy and will prevent known privilege escalations (allows deployment of pods with default configuration)
- Restricted: This heavily restricted policy follows the current pod hardening best practices
Pod Security Admission (using a Pod Security Admission controller) enforces these Pod Security Standards by intercepting API server requests and applying these policies.
Note: Previously, the roles of PSA and PSS were fulfilled using PSPs (Pod Security Policies); however, as of Kubernetes v1.25, these have been removed. Just to save any confusion if you stumble across PSPs doing some extracurricular Kubernetes security study!
As you can see, a lot goes into fortifying a Kubernetes cluster and plenty to keep a DevSecOps engineer busy. These are some of the best practices involved in Kubernetes hardening. DevSecOps engineers, while following these practices and utilising techniques such as automated security checks, can ensure their Kubernetes environment is safeguarded against cyber threats.
Which best container security practice is used to regulate access to a Kubernetes cluster and its resources?
RBAC
What is used to define security policies at 3 levels?
Pod Security Standards
What enforces these policies?
Pod Security Admission
What Kubernetes object can be used to store sensitive information and should, therefore, be managed securely?
Secret
Task 8 Hands-on with Kubernetes
Getting Started
Press the green Start Machine button located at the top-right of this task. The machine will start in split-view. In case it is not showing up, you can press the blue Show Split View button at the top-right of the page.
Phase One: Explore
Okay, let's get going, shall we? The first thing we want to do is start our Minikube cluster. You can do this by running the following command in the terminal (the cluster will take a couple of minutes to start up):
minikube start
Once the cluster has started up, you're ready to go! This guided walkthrough will take you through this cluster, reinforcing knowledge taught in the room. That being said, you have a Kubernetes cluster at your disposal, so feel free to explore the cluster and experiment with the different commands you have learned so far!
Let's see what's running already, shall we? We can do this using the following command (-A for all namespaces)
kubectl get pods -A
After running this, you should see a few pods running. These are the default pods present when you first start a Kubernetes cluster (you may recognise some of these names as they represent some of the control plane and worker node processes). Exciting stuff! But how about we make it more exciting by adding a deployment and service into the mix? On the VM you will be able to find some config YAML files located here:
~/Desktop/configuration
There are two config YAMLs here of interest to us: nginx-deployment.yaml and nginx-service.yaml. Check these configuration files out using the cat command:
cat filename
Let's break down what we see in each of these files:
nginx-deployment.yaml
This is a relatively simple deployment; we can see the desired state has been defined as a single replica pod, inside of which will be a container running an nginx image. From the other lines, we can determine that this pod will be used to run some kind of web app.
nginx-service.yaml
This, again, is a straightforward nginx NodePort service being defined here. The eagle-eyed among you may have noticed that the 'selector: -> app: ' field matches the app label defined in the deployment, as well as the 'targetPort' matching the 'containerPort' outlined in the deployment. This service exposes the web application running in the pod, which the deployment controls. To apply the configuration outlined in these YAML files, we use the kubectl apply command. Remember to apply the service file first! Like so:
kubectl apply -f nginx-service.yaml
kubectl apply -f nginx-deployment.yaml
Verify the replica pod is running by using the following command (not providing any namespace flag will get all the pods in the default namespace, which is where our pod should be):
kubectl get pods -A
You should now see a pod with 'nginx-deployment' in its name! Our deployment has been started!
Phase Two: Interact
Okay, now we have a web application running in a pod, which is being exposed by a service. If you recall the nginx-service.yaml, the service connects to the web application using the target port of port 80 (the port where the container is exposed). However, the service's port itself is set to 8080. We want to access this service. We will do this by using the kubectl port-forward command, which allows us to forward a port on our localhost to the Kubernetes service port (8080). Here is the full command to do so:
kubectl port-forward service/nginx-service 8090:8080
After running this command, open a web browser (Firefox) and access the web application at the following address:
http://localhost:8090/
Looks like a simple login terminal, but it needs credentials. Why don't we see if there are any Kubernetes secrets on the cluster that can help us log in to the terminal? Open another terminal window (so the previous window continues to port-forward) and run the following command to see if there are any secrets (in the default namespace):
kubectl get secrets
Ahh, there is! "terminal-creds" sounds like we are onto a winner! Using the kubectl describe command, we can get more details on this secret to see what is being stored here:
kubectl describe secret terminal-creds
In the description, we can see that two pieces of "Data" are being stored: a username and a password. While Kubernetes secrets are stored in plaintext and not encrypted by default, they are base64 encoded, so we pipe this command and base64 decode the output to get it in plain text. To access this data, we can use the following command:
To get the username, run:
kubectl get secret terminal-creds -o jsonpath='{.data.username}'| base64 --decode
To get the password, run:
kubectl get secret terminal-creds -o jsonpath='{.data.password}'| base64 --decode
Use these credentials to access the login terminal. That's a bingo! We're in, and you have retrieved the flag!
Bonus Task: For those curious enough, you can use an alternate method to get this flag. It will require some Kubernetes investigation on your part, but the first breadcrumb lies in the nginx-deployment.yaml!
Phase Three: Secure
It's great that we could access the terminal using the credentials stored in the Kubernetes secret, but as a DevSecOps engineer, this is where our alarm bells should be going off. Time for us to get to work with some Kubernetes secret management. With these credentials being sensitive information, we want to restrict access to the Kubernetes secret they are stored in. We can do this by configuring RBAC (Role-Based Access Control).
First things first, let's decide who it is we want to be able to access this secret. Your DevSecOps manager has suggested that you restrict access to a service account, which is essentially an identity a pod can assume to interact with the Kubernetes API/cluster. By doing this, we can maybe even set it up so that in the future, our daily terminal tasks can be run by an application in a pod. Let's use the kubectl create serviceaccount (can be abbreviated to 'sa') command to make two service accounts, the 'terminal-user' for non-admin terminal activities (should not have access to secret) and the 'terminal-admin' for admin terminal activities (should have access to secret). Run these two commands to make those service accounts:
kubectl create sa terminal-user
kubectl create sa terminal-admin
With those service accounts created, it's time to restrict access to the 'terminal-creds' secret so that only the 'terminal-admin' service account can access it. We are going to do this by defining and applying two configurations. First of all, a Role YAML that defines the role and what it can do (get the 'terminal-creds' secret). Then, a Role Binding YAML that binds the role we have defined to the 'terminal admin' service account. Navigate to the following directory and cat the two YAMLs to examine how these are defined:
~/Desktop/configuration/rbac
role.yaml
Here, you can see we define a role named "secret-admin". In the rules section, we define what it is this role can do. We define the resource (secrets), what verbs are being restricted (we are restricting the 'get' verb, but you could restrict others) and finally, the name of our secret (terminal-creds).
role-binding.yaml
In this YAML, we bind the 'terminal-admin' service account (in the 'subjects' section) with the 'secret-admin' role defined above (in the roleRef section).
Lets now apply these configurations the same way we applied the deployment and service (using kubectl apply):
kubectl apply -f role.yaml
kubectl apply -f role-binding.yaml
You have now configured RBAC for this Kubernetes secret! The only thing left to do is test whether our RBAC is working. We can do this using the kubectl auth command, which tells us if a service account has sufficient permission to perform a specific action. Let us first verify that the regular 'terminal-user' service account CAN NOT access the secret:
kubectl auth can-i get secret/terminal-creds --as=system:serviceaccount:default:terminal-user
It looks like we expected. This "no" response confirms that this service account can no longer access the terminal-creds secret. Now, finally, let us verify that our 'terminal-admin' service account CAN access it:
kubectl auth can-i get secret/terminal-creds --as=system:serviceaccount:default:terminal-admin
With this "yes" output, you have confirmed RBAC is in place and fulfilled your duty as a DevSecOps engineer, fortifying the cluster and taking a good first step into hardening this cluster. Hope you've enjoyed taking a little tour around this Kubernetes cluster and getting to know the basics. Until next time!
Can you master the basics of Kubernetes and retrieve the flag?
THM{k8s_k3nno1ssarus}
What apiVersion is used for the RoleBinding?
rbac.authorization.k8s.io/v1